cricut, resin

DIY Resin Coasters

I have been using resin to coat my paintings for a while now but just recently I’ve been starting to experiment with resin casting in silicone molds. I’m having so much fun with it and trying to create some unique usable art!

You can also create your own resin coaster with a few materials. Here’s a list of materials I used to create my simple coasters;

Coaster Silicone Molds: https://amzn.to/2TWx1Rq

Heat Resistant Resin: https://amzn.to/2RpJjQC

Art Resin Tint: https://amzn.to/2Gq2Jyw

Alcohol Inks: https://amzn.to/37uYTjp

So for these silicone coaster molds I’ve discovered that 10 ounces of resin fills four molds. I also used this heat resistant resin because if you want to put a hot mug on it then it won’t hurt the coaster. It’s important to make sure you use the right kind of resin for your project. There are a few other brands of resin out there but just make sure to do your homework or use the one I’ve linked above as this is the same one I used. I mixed the resin according to the instructions which was a 1:1 ratio. So 5 ounces of resin and 5 ounces of hardener. I mixed it up for a couple minutes making sure to scrap all the sides and bottom. You can tap the mixing cup on the table a few times to help get the bubbles to the surface.

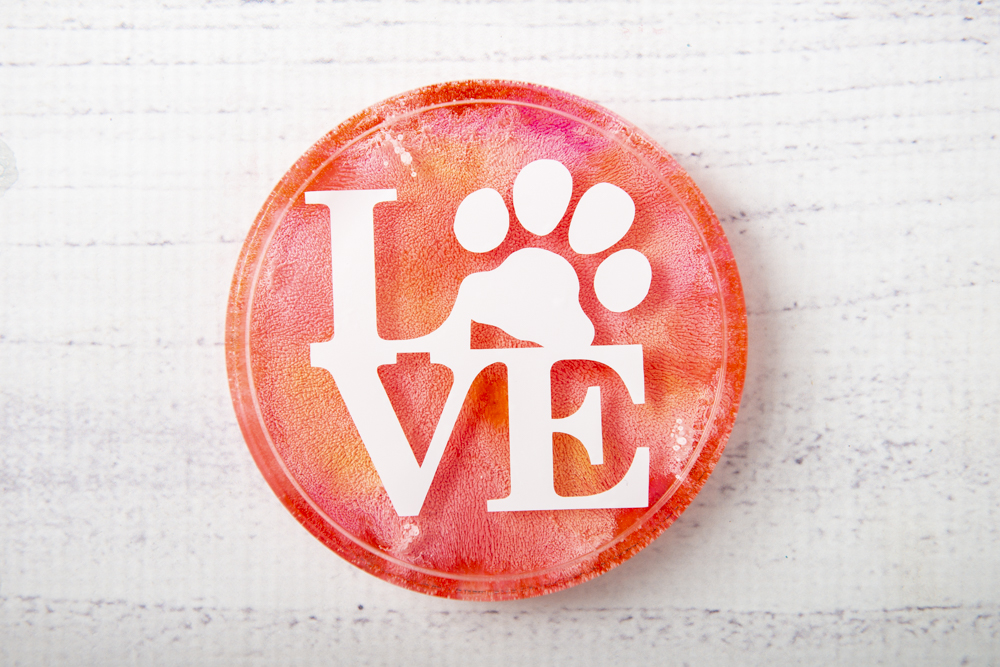
You can use Art Resin Tints to color your resin if you like of pour your resin clear and use the alcohol inks to drop into the resin which creates a beautiful and colorful effect like the in the picture below.

ResinCoaster_202001010008

I love how the alcohol inks create beautiful atmospheric colors! You can watch me create this coaster in my CraftyJenn YouTube video: https://youtu.be/s4uWnOdiN0Y

It will take approximately 12 hours for the resin to cure. Every resin has different curing times so make sure to read the labels. After the resin has hardened you can keep the lovely coaster as is or choose to embellish it with some vinyl applications. I use my Cricut Cutting Machine to cut designs out of vinyl that I applied to the surface of my coaster. This is the reason I love this particular silicone mold as it has a small lip around the edge and I knew that if I was going to add my vinyl I could then add another thin layer of resin over top of the vinyl to seal it in and protect it from damage. With the edge being there it’s super easy to simply add that thin layer over and not worry about the resin pouring over the sides. You can also embellish your resin with glitter too!

Here are a few examples of the coasters where I added some vinyl embellishment to the top and then sealed them in with a thin layer of clear resin (the same heat resistant resin).

Resin_202001100006-Edit-2Coasters_202001250004-EditResinCoaster_202001010007

If you are interested in more creative art or crafts please visit and subscribe to my

CraftyJenn YouTube Channel!

If you are interested in more resin or art supplies please visit my

CraftyJenn Amazon Store!

I greatly appreciate you using my Amazon links as I make a small commission from this at no extra cost to you but it helps me out greatly! So thank you SO much for using them.

I hope you are all having a wonderful day and thank you SO much 🙂

Acrylic Pour, cricut

Holiday Acrylic Pour Artwork!

Hello everyone! I hope you are all doing well and in the festive holiday mood 🙂 I had so much fun creating this Holiday Acrylic Pour piece and wanted to share with all of you how I created it. It’s a great Christmas or holiday project to do yourself or with your family.

Also, I now use the LoliVefe Jumbo Silicone mat to work on as it’s super easy for clean up, great for acrylic pouring on, perfect for crafts with kids and will protect your table top surface. If you’re interested in one please visit; https://lolivefe.myshopify.com and use my code:    Jenn5    to get a 5$ discount on any Jumbo or Mega Mat!!

So for my holiday pour I used these paint colors; FolkArt Aqua Flash, Artist’s Loft Brilliant Blue, and Artist’s Loft Black.

I did a dirty cup pour on a 10×20 inch canvas I bought at Michaels. I LOVE the way these colors worked together!! I think it looks like a blue Northern Lights! I wanted the background to be dark like the night sky but with acrylic pouring it adds depth and character than just painting a dark blue sky. If you are interested in acrylic pour painting and how I mix my paint check out my “Acrylic Pouring for Beginners” eBook which details everything you need to get started including links to supplies. You can also visit my CraftyJenn Amazon Store for all your supply need too 🙂

Once the Acrylic Pour Painting dried I cleaned it with a little Isopropyl Alcohol to get all the silicone off, then added a coat of Liquitex Gloss Varnish and let that dry. I used my pre-cut vinyl of the trees and deer for the 10×20 canvas that you can get on my CraftyJenn Art Store. I applied some more Liquitex Gloss Varnish and then peeled the vinyl off the paperback and applied it to my painting in the wet varnish. You can move your vinyls around until you get them in the place you want. Once I finished applying all my vinyls I let it dry and painted a few tiny white dots everywhere to make it look like stars though it looked more like falling snow which I was totally happy with! I made the dots small and some larger to add some variety to the stars/snow. Let that dry and added a few coats of Liquitex Gloss Varnish over the whole painting including the vinyl. And Voila! It’s my favorite Holiday Painting yet!!!

APtreesdeer_201911270008-Edit

You can watch me create this beautiful holiday artwork on my

CraftyJenn YouTube channel!


APtreesdeer_201911270008-Edit-2

Acrylic Pour

OCEAN HORSES Acrylic Pour/Swiping!

I had SO much fun creating the Ocean Horses acrylic pour painting!! I used my Cricut Explore Air 2 to cut some vinyl and create a silhouette of horses running. I LOVE that this technique worked and turned out 🙂 If your interested in the Cricut just click HERE.

I’m also going to try and create one using everyday items instead of the Cricut as I know not everyone has one so stay tuned 🙂

I hope you all can see the horses running out of the wave!!

AcrylicPour_201805230006AcrylicPour_201805230008

Here’s my YouTube video on how I created this Ocean Horse Wave!!